Painting work in progress for Warhammer 40K, Warhammer, WWII, Bolt Action, Konflikt '47, NZ 2nd division in North Africa and Italy, the LRDG, Pike & Shotte, and various other wargaming models and armies.
Wednesday, 26 July 2017
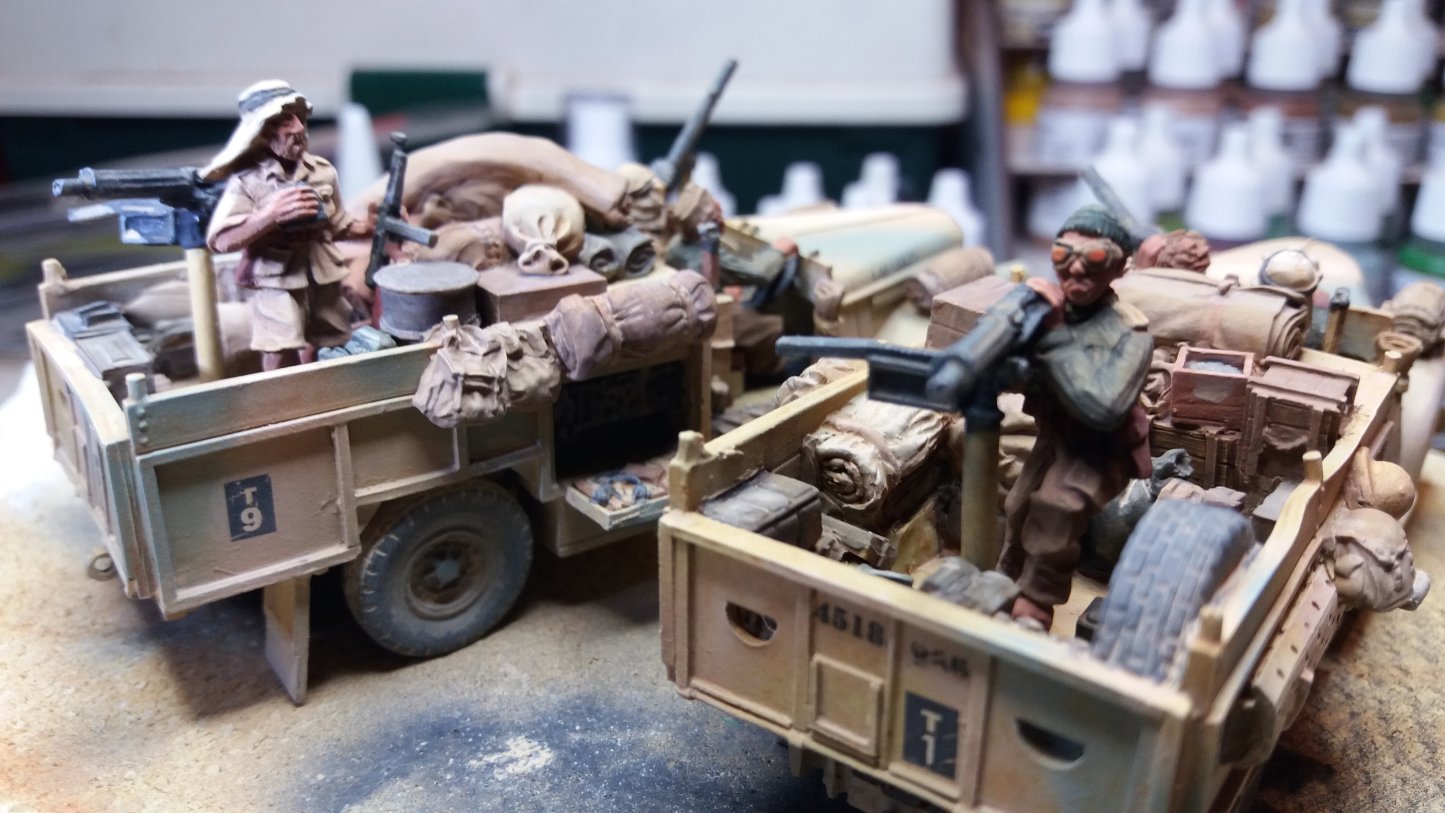
LRDG Trucks completed
Finally. These two LRDG trucks and their six crew have taken much longer to complete than any of the previous vehicles. So much stowage. And it hasn't helped that time available to paint has been less available.
Following on from the work in progress post, the basecoats were built up and the many, many pieces of stowage were painted, repainted, washed, and highlighted. The wheel hubs were airbrushed by making a small paper and tape mask to shield the rubber and light stone, blue, or pink was applied.
The Company B decals were added to both vehicles; the decals needed to have excess backing trimmed and were susceptible to surface scratching - more so than other decals I've used. The scratching wasn't very important as they were going to get weathered anyway, but it meant I had to be very careful during the process.
Each of the six crew was detailed, though I'm still not happy with my ability to do faces. The Warlord crew are in a nice variety of clothes, a mix of KD shirts and shorts, leather chaplis sandals, BD trousers and jerseys, FS and knitted caps, and the iconic Arab keffiyeh headdress.
The crew and vehicles were assembled and varnished, and then weathered in much the same manner as the Marmon-Herrington armoured car using AMMO of Mig Jimenez Ochre for Light Sand as a filter coat, with AK Interactive Africa Dust added to edges and areas were dust would build up, and finally some AK North Africa dust pigment was added, mostly to the tires.
A final coat of varnish, and the first two LRDG 30 cwt trucks are finally ready to roll off my worktable.
I'm not sure what I'll do next. Ideally it should either be Konflikt '47 infantry or some more of this "Behind Enemy Lines" force, but I think it'll have to be something simple and relaxing.
Friday, 14 July 2017
Konflikt 47 US Heavy Infantry
Work and other activities continue to reduce painting, but I did manage to complete five US Heavy Infantry for Konflikt '47.
The figures were primed with Vallejo Olive Drab surface primer before being base coated with VMA Olive Drab.
AK Interactive paints from a US Army set supplied red leather, canvas tone, field drab, and olive green for the belts, pouches, boots, and bits of equipment on the models. The US flags and the Sgt.'s stripes came courtesy of some Warlord paratrooper decals.
After sealing the acrylic an Ammo of Mig enamel wash was used - the same as for the M5A2 Coyote. I'd decided that as these models were encased in heavy armor that I'd treat them almost as mini-vehicles and repeat the same weathering techniques that I'd used on the walker, just a little less heavily.
The figures got some scavenged 30mm bases - the standard Warlord bases looked just a little small, but the Warlord 40mm bases looked huge. These ones were donated by some Dreamforge troopers and seem to fir well. The bases were finished with some flock and Army Painter "tufts".
One of these days I might even have a finished Konflikt '47 force... just have to actually paint some standard infantry now.
Next up though there are two LRDG 30cwt trucks that are ever-so-slowly moving towards completion.
The figures were primed with Vallejo Olive Drab surface primer before being base coated with VMA Olive Drab.
AK Interactive paints from a US Army set supplied red leather, canvas tone, field drab, and olive green for the belts, pouches, boots, and bits of equipment on the models. The US flags and the Sgt.'s stripes came courtesy of some Warlord paratrooper decals.
After sealing the acrylic an Ammo of Mig enamel wash was used - the same as for the M5A2 Coyote. I'd decided that as these models were encased in heavy armor that I'd treat them almost as mini-vehicles and repeat the same weathering techniques that I'd used on the walker, just a little less heavily.
The figures got some scavenged 30mm bases - the standard Warlord bases looked just a little small, but the Warlord 40mm bases looked huge. These ones were donated by some Dreamforge troopers and seem to fir well. The bases were finished with some flock and Army Painter "tufts".
One of these days I might even have a finished Konflikt '47 force... just have to actually paint some standard infantry now.
Next up though there are two LRDG 30cwt trucks that are ever-so-slowly moving towards completion.
Sunday, 25 June 2017
WIP and Winston Churchill
A work in progress post plus a single completed (sans base) personality figure.
I was unable to resist the urge to get a copy of the Operation Sea Lion book for Bolt Action, and local supplier Mighty Ape (who have a pretty good range of Warlord) also provided the launch figure of Winston Churchill with a tommy gun which provided some fun (and eye-strain) painting up. He still needs a base, which will of course have to be "green and pleasant".
Aside from Winny, I've been working on, but failing to complete some Konflikt '47 US heavy infantry, and two LRDG 30 cwt Chevrolet trucks.
Various home-life related things have meant I haven't had quite the same time or enthusiasm for painting these last couple of weeks, so the US troops are still sitting there waiting for detailing. The basic colours are done, but washes and highlights are needed, and as they are almost small walking vehicles I'm planning to use some armour weathering techniques too.
I did however get enthused to start work on my LRDG patrol, which along with some SAS sections will make a Bolt Action army using the "Behind Enemy Lines" theater selector. The LRDG portion of the army will be using LRDG Chevys from Warlord, Offensive Miniatures, and Company B; starting out with two Warlord trucks that have been waiting for quite a while. I really like the Warlord LRDG vehicles, but they only have machine guns, the Offensive and Company B trucks will be providing a Breda and 37mm AT gun portee respectively.
The Warlord trucks, and a Jeep that came as part of the same bundle, have resin bodies with metal wheels, bumpers, guns, and crew. The trucks bodies are two part: a common front end, and two different rear sections stuffed with stowage. Each also comes with three crew: a driver that is the same for both, and front and rear gunners that are specific to the variants. The crew all have separate heads, with extras to choose from, so quite a bit of variety is possible.
The trucks went together very easily - one front section had a slightly warped under-carriage, but that was quickly fixed with some hot water while cleaning the pieces.
After assembly all were primed with Stynylrez yellow primer, the wheels were left off and painted separately. (The bumper is missing from the Jeep in this shot - I found it later in the packaging.)
I wasn't sure how best to spray the wheels, so some cocktail forks and a kebab skewer got turned into a makeshift frame with the wheels threaded on. These were first primed grey, and then painted with VMA Panzer Black Grey.
I thought I might try pre-shading the trucks, so sprayed dark (VMA Khaki No. 3) and light (Reaper Splintered Bone) on areas before applying the basecoat. It was a fairly subtle effect but is visible on the models; I still need to work on applying thin coats of paint.
The trucks were given an overall spray of VMA UK Light Stone, and then freehand camouflage patches of light blue and desert pink. I had a hunt through my paints before settling on VMA Hellblau (RLM65) for the blue, and a 3:1 mix of VGA Pale Flesh and VMA US Desert Sand for the pink. The first attempt at pink used a 1:1 mix, and looked about where I want the colour to end up, but once weathered would I think have pretty much disappeared, so I over-painted with the more pink mix.
Currently the trucks are getting their crews and all the stowage painted, and I'm waiting on decals from Company B with "T Patrol" markings.
Sunday, 11 June 2017
M5A2 Coyote & Sherman T - Konflikt '47
After getting a bit distracted by the Marmon-Herrington and X-Wing, the US troops for Konflikt '47 have finally got back on track with a M5A2 Coyote light walker and M4A9 Sherman-T medium tank completed.
The walker does need a base, but I'm still considering how to base the US troops generally and want them consistently themed, so that can wait a bit.
Both were primed in the same way as the M8 Grizzly walker with Vallejo US Olive Drab surface primer, and then base-coated with some colour modulation using VMA US Olive Drab as the base, darkening with RLM 70 Black Green and lightening with Yellow Ochre.
Decals came from the Warlord Sherman kit and from a Rubicon Models generic Commonwealth sheet. On the walker I added a US flag on the right shoulder (as I'd done for the Grizzly) to blur the lines a little between vehicle and troop markings because of the walker's humanoid shape.
For the Coyote I decided to go a bit further, and as it's a one man suit decided to add rank markings. Carefully cutting apart a German cross provided some appropriately sized chevrons which got added to the left "fore-arm".
When it came to weathering I changed the filter a bit. I was happy with how the Grizzly turned out but felt that the Dark Brown for Green enamel (intended for use on Soviet armour) was perhaps just a bit dark and decided to try a lighter tone.
Both the tank and the walker were given a wash of Ammo of Mig Brown for German Dark Yellow. This didn't darken the olive drab as much but did seem to enrich the colour. I'm very happy with that result and plan to use the same wash on my heavy armoured troopers.
Streaking grime was used on the tank particularly and I had my first go with using an airbrush to spray mud off a paintbrush to create splashes. Tip for the novice: reduce air pressure. After cleaning up the initial mess I gently added new splashes.
I'm mostly happy with the final effects, the weathering is something I need to practice and work on; it's all a learning experience.
I also have five US heavy infantry partially completed, but am starting to feel LRDG-ish, so we'll have to see what gets painted next.
The walker does need a base, but I'm still considering how to base the US troops generally and want them consistently themed, so that can wait a bit.
Both were primed in the same way as the M8 Grizzly walker with Vallejo US Olive Drab surface primer, and then base-coated with some colour modulation using VMA US Olive Drab as the base, darkening with RLM 70 Black Green and lightening with Yellow Ochre.
Decals came from the Warlord Sherman kit and from a Rubicon Models generic Commonwealth sheet. On the walker I added a US flag on the right shoulder (as I'd done for the Grizzly) to blur the lines a little between vehicle and troop markings because of the walker's humanoid shape.
For the Coyote I decided to go a bit further, and as it's a one man suit decided to add rank markings. Carefully cutting apart a German cross provided some appropriately sized chevrons which got added to the left "fore-arm".
The Sherman's Tesla gun was painted with a Vallejo Dark Blue and then given several progressively lighter coats by adding Reaper MSP Sapphire Blue and LED Blue, each leaving a little of the darker colours in the depths. The final colours were pure MSP LED Blue and then some fine lines of MSP Maggot White.
Both the tank and the walker were given a wash of Ammo of Mig Brown for German Dark Yellow. This didn't darken the olive drab as much but did seem to enrich the colour. I'm very happy with that result and plan to use the same wash on my heavy armoured troopers.
Streaking grime was used on the tank particularly and I had my first go with using an airbrush to spray mud off a paintbrush to create splashes. Tip for the novice: reduce air pressure. After cleaning up the initial mess I gently added new splashes.
I'm mostly happy with the final effects, the weathering is something I need to practice and work on; it's all a learning experience.
I also have five US heavy infantry partially completed, but am starting to feel LRDG-ish, so we'll have to see what gets painted next.
Sunday, 4 June 2017
Bandai X-Wing 1/72 - mostly out-of-box build
Something slightly different - even considering my getting distracted and working on this and that. A couple of weeks back I received a Bandai Millenium Falcon 1/144 kit as a belated birthday present from my wife. I'm intending to paint, detail and light the kit so my son was a bit disappointed that we couldn't just dive into an "out of the box" build; he and I have built a few Bandai Gundams in past.
I decided to pick up another kit from the same same range and build it with him just as it came, not painting, using the vinyl stickers rather than waterslide transfers, and so on. A local supplier was having a bit of a sale and I bought a Bandai X-Wing Red Squadron box.
The kit comes with two X-Wings, one at 1/72 which we planned to build, and one at 1/144 which I'm holding on to and will paint up to accompany the Falcon. Like all of the Bandai kits I've seen the engineering and detailing is superb, and the kit goes together without requiring glue. In many ways they're more 3D puzzles than traditional military kitsets.
The kit is branded as "Rogue One" and the supplied stickers have squadron markings for Red 1 through 5 (by adding additional red flashes to the wings). The pilot was supplied in white plastic, with some helmet stickers, and the astromech came with gold stickers.
My son however was keen on Luke's "A New Hope" Red 5, which is where a little painting came in. He was happy with the vehicle markings as supplied, but wanted the pilot to be more like Luke and the astromech as R2D2.
So, orange jumpsuit with white harness, chest panel, etc., and a blue and silver droid. I also decided to paint the cockpit too in a very basic scheme as I'd some problems with the cockpit stickers. The large stickers are fine, and nicely detailed, but the the small stickers don't have much surface area for adhesion, and when you're trying to affix them to complex shapes it can be a little frustrating.
The paint-job was fairly basic, after priming the jumpsuit was painted with Reaper MSP Lava Orange and shaded with Army Painter Jumpsuit shader. I had intended to use AP Prison Jumpsuit (from an AP Zombicide paint set I'd picked up) but the AP orange was watery and useless. All of the other AP paints I've used have been great; I don't know if this is just an isolated case, or if the Zombicide sub-brand are different. The shader was fine, I'll have to try out the other paints in the set. The rest of the painting was mostly Vallejo this and that, and the helmet got the supplied waterslide red rebel symbols.
One warning for kit builders: the pilot cannot be fitted into the assembled cockpit. While the pilot and droid were being painted the build continued. The droid can be put in by removing a single part and sliding another (no glue remember), but after the pilot was ready we discovered that a large proportion of the fuselage had to be carefully disassembled to get his feet under the dashboard.
After finally getting the pilot in, many, many more stickers were added in order to get Red 5 ready to make that one in a million shot.
And now back to Konflikt '47 US troops... probably...
I decided to pick up another kit from the same same range and build it with him just as it came, not painting, using the vinyl stickers rather than waterslide transfers, and so on. A local supplier was having a bit of a sale and I bought a Bandai X-Wing Red Squadron box.
The kit comes with two X-Wings, one at 1/72 which we planned to build, and one at 1/144 which I'm holding on to and will paint up to accompany the Falcon. Like all of the Bandai kits I've seen the engineering and detailing is superb, and the kit goes together without requiring glue. In many ways they're more 3D puzzles than traditional military kitsets.
The kit is branded as "Rogue One" and the supplied stickers have squadron markings for Red 1 through 5 (by adding additional red flashes to the wings). The pilot was supplied in white plastic, with some helmet stickers, and the astromech came with gold stickers.
My son however was keen on Luke's "A New Hope" Red 5, which is where a little painting came in. He was happy with the vehicle markings as supplied, but wanted the pilot to be more like Luke and the astromech as R2D2.
So, orange jumpsuit with white harness, chest panel, etc., and a blue and silver droid. I also decided to paint the cockpit too in a very basic scheme as I'd some problems with the cockpit stickers. The large stickers are fine, and nicely detailed, but the the small stickers don't have much surface area for adhesion, and when you're trying to affix them to complex shapes it can be a little frustrating.
The paint-job was fairly basic, after priming the jumpsuit was painted with Reaper MSP Lava Orange and shaded with Army Painter Jumpsuit shader. I had intended to use AP Prison Jumpsuit (from an AP Zombicide paint set I'd picked up) but the AP orange was watery and useless. All of the other AP paints I've used have been great; I don't know if this is just an isolated case, or if the Zombicide sub-brand are different. The shader was fine, I'll have to try out the other paints in the set. The rest of the painting was mostly Vallejo this and that, and the helmet got the supplied waterslide red rebel symbols.
One warning for kit builders: the pilot cannot be fitted into the assembled cockpit. While the pilot and droid were being painted the build continued. The droid can be put in by removing a single part and sliding another (no glue remember), but after the pilot was ready we discovered that a large proportion of the fuselage had to be carefully disassembled to get his feet under the dashboard.
After finally getting the pilot in, many, many more stickers were added in order to get Red 5 ready to make that one in a million shot.
And now back to Konflikt '47 US troops... probably...
Wednesday, 31 May 2017
Marmon-Herrington in Caunter Camouflage
So, in theory I'm supposed to be working on Konflikt '47 troops, but I got distracted and instead there's another small piece completed for my NZ 2nd Division North Africa force: a Marmon-Herrington Mk III armoured car from Perry Miniatures in Caunter camouflage. (I think the Kiwis had Mk IIs, but the MkIII has the same turret as the late IIs and is just a bit shorter.)
The resin kit was very cleanly cast and the the metal guns easy enough to attach. The wheels (which come in pairs with integral axles) have cast marks at one point on each tire, but it's easy enough to clean these off leaving a slightly flattened area and then use this as the bottom of the tire once attached. The top hatch covers weren't the easiest to attach though, as there are just thin flat edges to glue to the turret - enough to get a bond, but they're a little fragile, and I've had one detach twice now.
The driver is quite a nicely animated figure in FS cap and KD shirt and shorts, but the face is a bit disappointing for a Perry sculpt. He seems to have very heavy eyelids and a slightly oddly formed nose - it may just be this casting, though it looks fully formed. I tried painting in eyes, but it just looked weird, so in the end I left the face very plain.
The Marmon-Herrington was painted in a similar fashion to the M3 Stuart, with the same VMA Portland Stone and VMC Pale Green Blue (for the Caunter "silver grey"), but with VMA Khaki Green No. 3 instead of "slate". The amount of time I spent fussing around with masking tape has left me wondering whether I want to ever paint Caunter again.
After painting and sealing with varnish it got an AMMO of Mig Jimenez Ochre for Light Sand filter coat, AK Interactive Africa Dust brushed on most places, and then AK North Africa dust pigment added to create dust build up. I went a bit heavier on dust this time on the grounds this is a recce vehicle and likely to have done some hard traveling.
I'm still trying to get the right balance of too little effect and overdoing it. I have confidence I'll get it right sometime.
So, back to those Konflikt '47 troops. What's that you say... an X-Wing?!
Sunday, 14 May 2017
M8 Grizzly Medium Assault Walker - Konflikt '47
![]() |
| Finished M8 Grizzly |
Konflikt '47
Konflikt '47 is a weird war spin off of Warlord Games' WWII Bolt Action game, and a joint venture between Warlord Games, Clockwork Goblin Miniatures, and Osprey Publishing. Many of the troops used are standard late war WWII, but with the addition of armoured walkers, super soldiers, beastmen, and the walking dead. I was sold on it the moment I saw the first walker; there'll be more Konflikt '47 models in future posts.M8 Grizzly Medium Assault Walker
One of the early models released was the Allied forces "Grizzly" medium assault walker, and I've been wanting to make this up since I got it. Recent builds and a little experience now with my airbrush gave me the confidence to stop putting it off and have a go at this lovely model.The predominately resin model was cleaned up with clippers and knife and then washed in warm soapy water and lightly scrubbed with an old toothbrush. The parts fitted together very well, with good surface and contact for superglue. The only exception was some warping in the thin top plate that was easily fixed with hot water.
After assembly the Grizzly was primed with Vallejo US Olive Drab surface primer. In hindsight keeping some of the parts separate would have made basecoating easier - some of the nooks and crannies of the arms and legs were a bit difficult to get into later.
For basecoating, because this was going to be an almost single colour model, I thought I'd have a go at colour modulation. Having a look at what more experienced painters had done with Olive Drab it seemed the base colour should be darkened with a black (most used NATO black) and lightened with a yellow. The reason for these is that US Olive Drab is a mix of black and ochre, and lightening with white turns it a green-grey shade.
I didn't have NATO black but RLM 70 Black Green seemed similar enough, and for lightening Yellow Ochre seemed appropriate. The darkened shade was airbrushed onto the lower parts of the walker and into areas that would be shadowed while the lighter shade was used on upper and outer areas. A lighter again shade was drybrushed onto top edges.
The photo doesn't show it all that well but the colour variation was visible when looking at the model and helped break up the single colour.
The leather gun surround was painted in Army Painter Fur Brown, shaded with their Soft Tone ink and highlighted with a lightened shade of the same brown. A few limb joints along with the machine gun were painted black and then parts drybrushed with VMC Oily Steel which was also drybushed over the Olive Drab on the edges of the fists and in a few places were the paint could have been completely worn away. Chipping was applied with a foam sponge in VGC Charred Brown.
Deciding what markings to use on the the walker, and where to put these was interesting. It's an AFV but humanoid in shape with different places than a tank has to apply markings. In the end stars were applied on the top to the shoulder pads and to the rear butt plate, a vehicle number on one leg and a bridge loading weight number to the other. In a deviation from AFV markings I also added an American flag to echo the shoulder patches worn by US solders.
With the basecoating done and decals in place the walker was given a coat of varnish before weathering with enamels.
The whole model was given a filter wash using AK Interactive Dark Brown for green vehicles. Pipes, bolts, and some other areas around the engine and fists has Light Rust applied, and then Earth Effects and some Dark Brown dirt deposits (not shown) where added around the feet.
I still need to add a final varnish, but otherwise the model is complete.
Finally, not a great photo, but to give an idea of the size of the M8 Grizzly, here it is with a US Heavy Infantryman (on a 25mm base) and the M5A2 Coyote light walker (both from the US Konflikt '47 starter set).
Subscribe to:
Posts (Atom)