Thursday 28 December 2017

LRDG truck with captured Breda gun

Finally it's off the bench. This addition to the LRDG patrol has taken far too long to finish, and I'm not completely sold on the outcome unfortunately.

My painting got put on enforced hiatus as we were getting the house painted - so at least some painting was going on - but my table was covered up to prevent dust and paint getting everywhere and modelling just wasn't an option for a while.
Afterwards it was a matter of trying (and failing) to get back in to the habit of getting even a little painting done each night, rather than just putting things off.
Offensive Miniatures Chevy, Company B Chevy, Company B Blitz Buggy
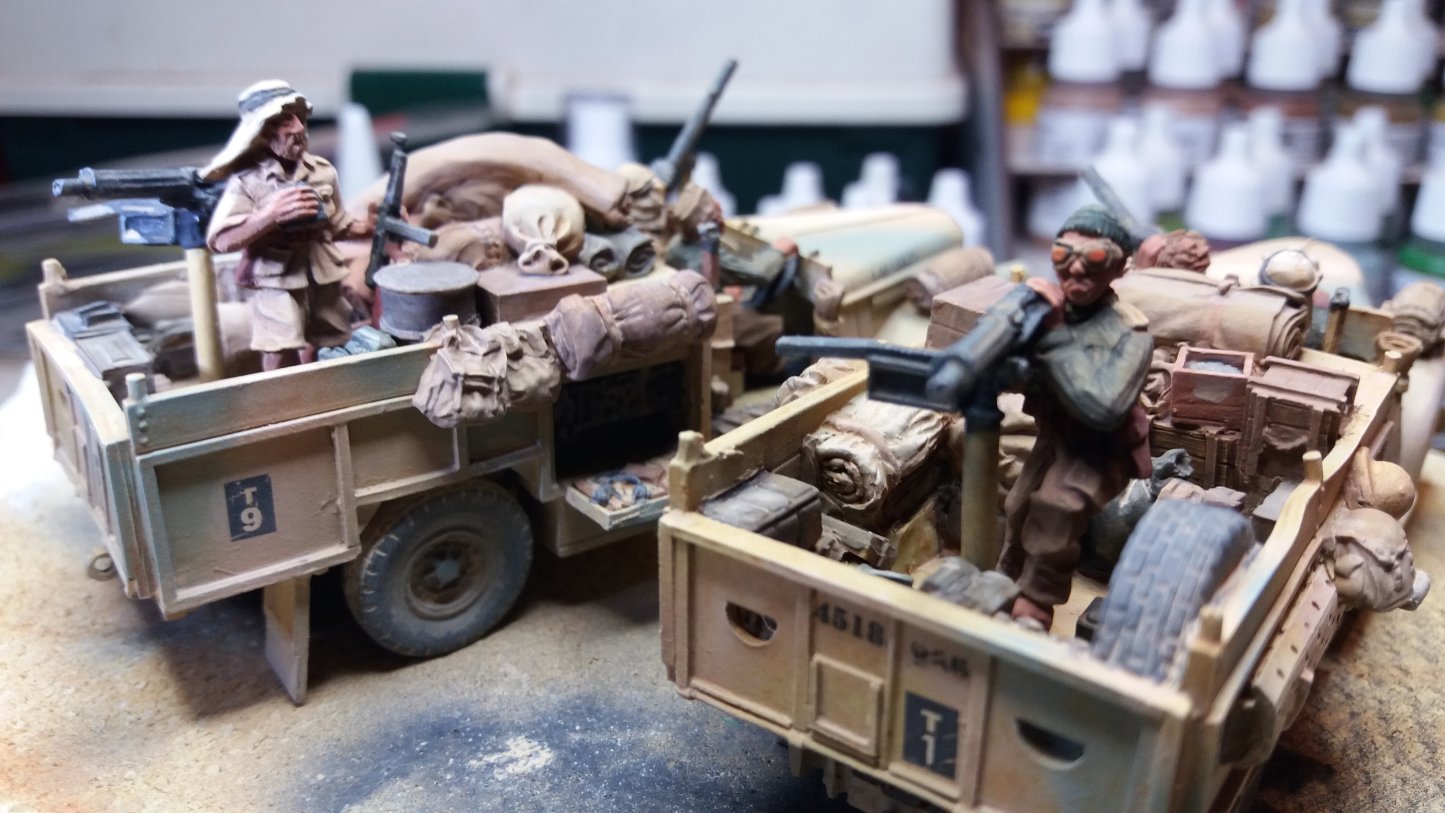
Unlike the previous LRDG trucks this one isn't a Warlord model, instead coming from the Offensive Miniatures 8th Army range. At about the same time I picked up a couple of vehicles and some crew from Company B; the crew in the front seat of this Breda armed truck are from Company B.

Size-wise the OM truck is a pretty good fit with Warlord - a bit shorter and a bit wider - but the figures I'm using for infantry are from Artizan and the OM figures are somewhat smaller. While that's not too noticeable on the Breda crew I wanted the front seat crew to match more closely. The Company B crew (sculpted by Paul Hicks) are quite similar in size and style to the other figures I'm using. The stowage is also a mix of the two.

The truck went together very easily, the Breda... not so much.  I ended up looking at as many reference photos as I could find, and concluded that the assembled example on the OM site doesn't actually quite mach the historical images around the sighting bar placement.
The truck, gun, and crew were all primed with Stynylrez yellow primer, and then the truck and gun were basecoated with an overall spray of VMA UK Light Stone, while the crew got VMC Iraqi Sand.
Freehand camouflage was added in VMA Hellblau (RLM65) for the blue, and a 1:1 mix of VGA Pale Flesh and VMA US Desert Sand for the pink.  I should have gone back and checked my own notes and used the 3:1 ratio as the Pink has almost disappeared after the weathering. (Mistake #1.)

Company B LRDG decals were added and sealed, crew, stowage, and accessories finished, and the components assembled.

The whole model was given a sealing coat and allowed to dry before weathering. For some reason I used Italeri Flat Acrylic for the sealant where previously I've been using AK Interactive Ultra Matte. Whether this was the cause, or the hot and humid weather we'd been having I don't know, but the enamels seemed to react a little with the sealant and ended up a bit sticky. (Mistake #2.)
 The truck was weathered in much the same manner as the Marmon-Herrington armoured car using AMMO of Mig Jimenez Ochre for Light Sand as a filter coat, with AK Interactive Africa Dust added to edges and areas were dust would build up, and finally some AK North Africa dust pigment was added, mostly to the tires...and into some of the sticky areas.  The crew got a half-strength filter coat so they too would have the dusty desert look.

The end result is... OK?  I'm just not as happy with the outcome as with the two previous LRDG trucks, but at least the three are now done, which I suppose means I should get onto the infantry and the other transport vehicles.
Here's all three (with the captured Opel Blitz in the background), and a final size comparison photo.
Left to Right: Warlord LRDG Chevy, Offensive Miniatures LRDG Chevy with Breda, Rubicon Models Opel Blitz.


Saturday 30 September 2017

Reaper Yeti


Another not very productive month on the miniatures front, but I managed to squeak something else out before October. After the Hill Giants I thought continuing to work on the Bones would be good and picked out the four Yeti (or is that "Yetis"?) sculpted by Jason Wiebe from the Reaper Bones III Kickstarter.  Three of the four are available now in Bones from the Reaper store: Yeti Warrior, Yeti Shredder, and Yeti Shaman. The Chieftain doesn't seem to be available just yet in Bones, only in the original metal.

The Bones figures are all pretty good, though comparing with the metals it appears that the fingernails / claws of the new figures perhaps lack some definition. There are also the to-be-expected Bones mould lines, which I personally find quite hard to see before undercoating and then alarmingly obvious afterwards.
The Yeti were undercoated with a mix of MSP Sapphire Blue and Sealer, thinned for the airbrush. At the same time I undercoated the Ice Troll by Ben Siens, also available in Bones. (Interestingly the metal original is listed a "Hellborn Troll".)  He got a similar undercoat but with Denim Blue (and turns up in some of the photos).
The Yeti got some blue wash (AP Blue Tone) followed by several dry-brush applications, each lighter and dryer than the previous. The first coat was 2:1 White to Sapphire Blue, then 4:1, and then 12:1, and finally MSP Pure White.

MSP Yellowed Bone, Graveyard Bone, and Splintered Bone were applied to claws, and the skull on the Chieftain's shoulder. AP Phoenix Flames followed by Babe Blonde was used for the eyes, and AP Gorgon Hide for eyebrows. MSP Stone Grey to stone details, and MSP Murky Brown, Tanned Leather, and Oiled leather used for final areas.
The bases had also been painted in AP Gorgon Hide (a pale bluish off-white), and were coated with thinned PVA and scattered with Army Painter "Snow" grit.
The Ice Troll is still to be finished, along with an intrepid (and about to be seriously inconvenienced) Arctic Explorer, and Ogres are also clamoring for attention... along with an LRDG truck.


Oh well, perhaps October will be more productive.

Saturday 16 September 2017

Reaper Hill Giants

With Bones 4 just finished on Kickstarter, and Bones 3 being delivered recently, I looked at the veritable mountain of unpainted Reaper miniatures I have hiding in every corner of the hobby room and decided to make a token gesture towards resolving this.
Burrowing through the pile I settled on the pair of Hill Giants that were part of Bones 2 four years ago. (Four years? Egads!)  Both are now available from the Reaper store: Golan, sculpted by Jason Wiebe, and Krug, by Tre Manor.

While cleaning them up and dry fitting parts they seemed to me to resemble a couple of movie characters, and so they have been dubbed Mr. Hyde and Mr. Gibbs. I'd note that mould lines became more obvious after undercoating... and could perhaps have been revisited (but weren't).

My previous experience with Bones had highlighted the hydrophobic properties of the plastic, and I wanted a really good foundation for the basecoat colours. Following advice from Reaper on priming and undercoating the miniatures were first washed thoroughly and then given a coat of Reaper MSP Murky Brown mixed with Reaper sealer (all thinned slightly to go through the airbrush).
 The base colours were a mixture of Reaper (MSP), Army Painter (AP), and Vallejo (VMA/VMC/VGC), all in the brown range. The MSP Tanned Flesh was mixed with a little brown to darken the first layers, lightened on successive layers. AP tones/washes were used on the furs and hair, and MSP Flesh Wash on the skin areas.
 Mr. Gibbs has iron manacles but otherwise I wanted to keep the metal areas in the gold/brown range so these were painted with either VMC Brass or AP Copper. These were darkened with AP Strong Tone, re-highlighted with metal, and then shaded with a mix of AP Green and Blue tone to create something of a weathered verdigris effect.
Golan got pink added to new scars, old scars were paled down, various skin lesions were added, and fur dry brushed to create texture.
Mr. Gibbs got some of the same, plus his bandages were painted using MSP bone shades, and the center shield on his belt coloured with VMC Black red to create a leather effect.
As I don't have a Garrick the Bold aka Sir Forscale I've substituted another knight...
...and that other universal standard of miniature scale: Brother Scala using his auspex to detect hostile xenos.
Next up... not sure yet , though I have another LRDG truck on the bench, this one with a Breda in the back.

Thursday 31 August 2017

Opel Blitz - under new management

After the two LRDG Chevrolet trucks with their masses of stowage, and as I been having trouble finding time to paint, I wanted to do something light and quick.  That was the plan anyway.

I've been wanting some transport for my Bolt Action LRDG/SAS force and rather liked the look of the Rubicon Models SdKfz 305 Opel Blitz.  Reuse of captured enemy vehicles was fairly common in the desert war so my plan was to use this model, but for simplicity as a "counts as" British truck for rules and transport capacity.  This Opel Blitz version is 3-ton, but the largest truck available in the "Behind Enemy Lines" list is half that at 30 cwt.  To indicate that only part of the larger vehicle is available for troop transport I decided to add... stowage.
I built a small block of stowage from some foam board (to give it height) topped with a pile of boxes under a tarp from Rubicon's Allied Stowage, along with a fuel drum and the spare wheel from the Opel Blitz kit. The German driver from the kit was replaced with an LRDG driver from a Rubicon Commonwealth jeep, with his legs trimmed off to fit into the cab.
After priming with Stynylrez yellow the truck body was basecoated Dunkelgelb and the rear section in a mid-brown. I painted a small dark shield-like shape on each truck door and then applied a small DAK insignia.  The body was then over-painted in UK Light Stone, with care taken to not fully obscure the DAK palm trees.The idea was to give the impression of a hurriedly re-painted vehicle; the interior of the cab is still Dunkelgelb, though this turned out to be nearly impossible to see without peering inside and using a light source.
An RAF air recognition insignia was added to the roof of the now British truck, along with a bundled up German flag that could be used in the event that pesky Luftwaffe were spotted. (I'm not sure if the LRDG ever did this, but have certainly read of the SAS carrying false air recognition signs painted onto boards.)
After a coat of varnish the truck was weathered with AMMO of Mig Jimenez Ochre for Light Sand as a filter coat on the truck body and Brown for Dark Yellow on the rear section, AK Interactive Africa Dust added to edges and crevices, and finally some AK North Africa dust pigment, mostly on the tires.
 Not sure what's next, but there are some Ghar staring at me.

Wednesday 26 July 2017

LRDG Trucks completed


Finally. These two LRDG trucks and their six crew have taken much longer to complete than any of the previous vehicles. So much stowage.  And it hasn't helped that time available to paint has been less available.

Following on from the work in progress post, the basecoats were built up and the many, many pieces of stowage were painted, repainted, washed, and highlighted. The wheel hubs were airbrushed by making a small paper and tape mask to shield the rubber and light stone, blue, or pink was applied.
The Company B decals were added to both vehicles; the decals needed to have excess backing trimmed and were susceptible to surface scratching - more so than other decals I've used. The scratching wasn't very important as they were going to get weathered anyway, but it meant I had to be very careful during the process.
Each of the six crew was detailed, though I'm still not happy with my ability to do faces. The Warlord crew are in a nice variety of clothes, a mix of KD shirts and shorts, leather chaplis sandals, BD trousers and jerseys, FS and knitted caps, and the iconic Arab keffiyeh headdress. 
The crew and vehicles were assembled and varnished, and then weathered in much the same manner as the Marmon-Herrington armoured car using AMMO of Mig Jimenez Ochre for Light Sand as a filter coat, with AK Interactive Africa Dust added to edges and areas were dust would build up, and finally some AK North Africa dust pigment was added, mostly to the tires.
A final coat of varnish, and the first two LRDG 30 cwt trucks are finally ready to roll off my worktable.
I'm not sure what I'll do next.  Ideally it should either be Konflikt '47 infantry or some more of this "Behind Enemy Lines" force, but I think it'll have to be something simple and relaxing.