Sunday 2 August 2020

Rubicon LRDG Chevy 30cwt Truck


An addition to the LRDG/SAS Bolt Action force, I'd been keen to get one of Rubicon's Chevrolet WB 30cwt trucks since they were released but had been putting it off as I still have two Warlord ones in the pile 'o' shame... but in the end I broke down and got one.


As it was a plastic kit, and the under-carriage was separate parts I decided to try out painting in sub-assemblies. The Rubicon crew are quite nice, but being true-scale 1/56th don't fit very well with the rest of my platoon that predominately uses Artizan Designs figures. The Rubicon crew went into the bits box and the truck got some spare crew from Company B. This required a bit of fiddling about to get them to fit (especially with the steering wheel) but worked out OK. The twin Vickers K for the front seat passenger was added from a Rubicon (Commonwealth) version jeep.


The body of the truck and the crew were primed  with Stynylrez neutral yellow, the undercarriage with grey, and the rest of the base coat painting was as for previous LRDG trucks


Pink and blue camouflage added. This time though I checked my earlier notes and kept the pink brighter, in order that it would still be somewhat visible after weathering.

After finishing this step I couldn't help but feel that more stowage was needed. There is some provided (the rolls on the front guards, and the POW cans on the running boards) but even after putting the spare tire in the back in just looked rather empty.


I raided my Rubicon stowage sprues and assembled a small collection of suitable bits and pieces to provide a feeling on the truck being full of stowage, without having the actually completely fill the back tray. These were painted in olive drab, olive green, and a variety of browns.


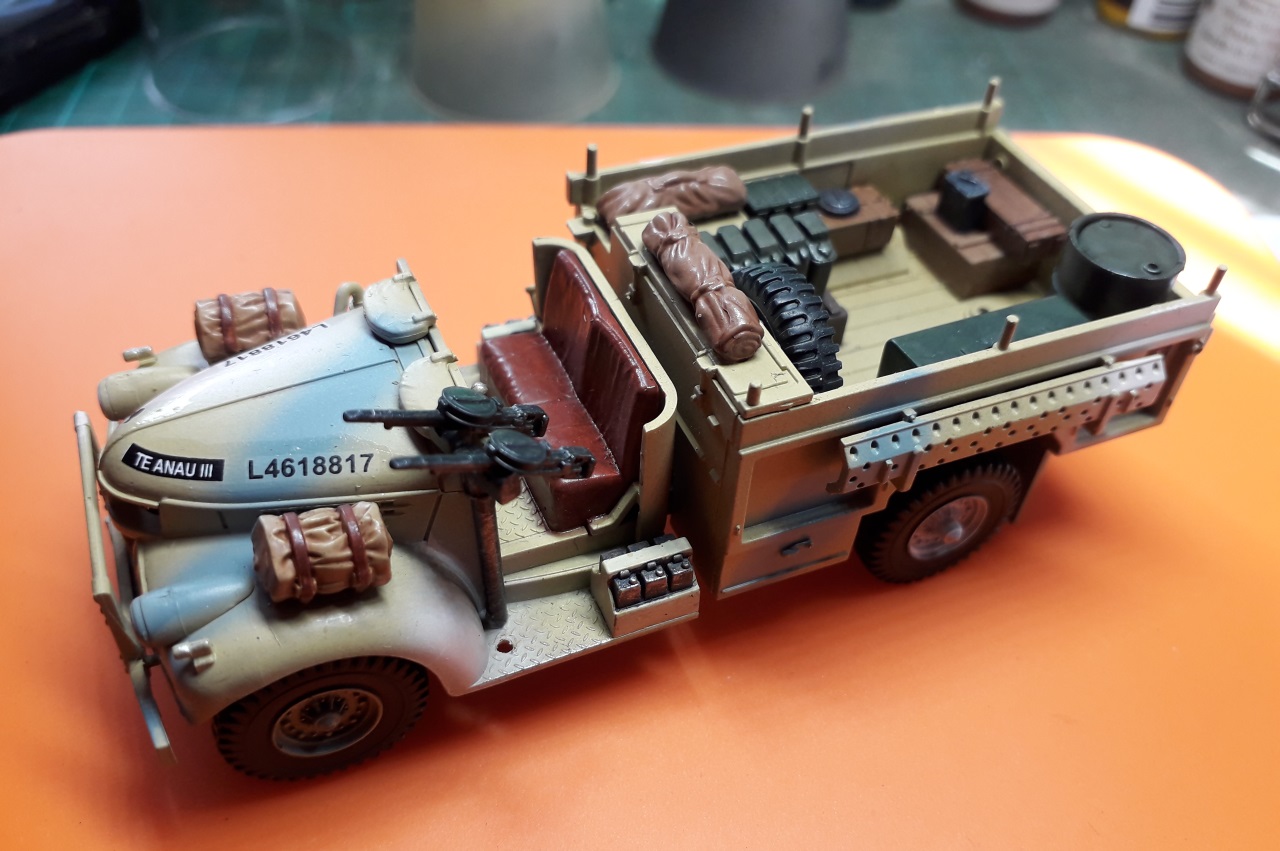
With the stowage in place, and decals added the bulk of the painting was complete and it was time to fit the crew and weather the model. Weathering was the same as for the previous trucks and the first half-strength filter was added to the crew as well to give them a dusty look and blend them in with the vehicle.


And that's it. Another truck for the LRDG / SAS force.

If anyone is interested in the scale / fit between the brands, this last photo shows, left to right: Warlord, Offensive Miniatures, Rubicon, and Warlord LRDG trucks. Height-wise the Rubicon is a little taller than the others (a result of of the detailed undercarriage) but it's not a significant difference.


Next up.... hmmm.... Necrons I think.

Saturday 6 June 2020

Cadian 287th - Kangaroo APC


Well, it appears I have successfully put off painting for quite a while, but fell err... back on the wagon (?) and managed to actually complete a new APC for my desert themed, 8th Army inspired, Cadian 287th Armoured.

Back in January I picked up one of the new Kangaroo APC models from Victoria Miniatures when they ran a fundraising appeal for the Australian bush fires and donated proceeds from the sale of these vehicles.


The Kangaroo is a 40K-compatible multi-part resin kit with options for the turret and hull guns that are similar to their GW counterparts. The turret comes with double gun (that could proxy as a heavy bolter), flamethrower, and a laser-type option, while the hull offers bolter and flamer.


I'd decided to not got overboard on magnetizing and customizing this model - a rabbit hole I've dived down a few times with my GW tanks, and satisfied myself with just magnetizing the two hull guns and putting in a magnet to keep the turret firmly in place. The hull guns are designed to take 5mm x 1mm magnets, and the turret had space for a magnet though there wasn't a recess in the hull, so I drilled one out. The main gun could have been be magnetized too, but I decided to just go with the twin cannon as a heavy bolter variant.


Size-wise the Kangaroo APC is the same width as a GW Chimera, while being a little longer. The hull is slightly lower and the turret slightly taller; overall the footprint is quite similar to the GW APC.


I added a bit of stowage - partially to help with the desert theming and partially because I was planning a simple main colour and wanted some elements that could contrast and add interest. These came off a GW super-heavy tank kit and helped add some 40K specific icons.


I wanted to try to improve some airbrushing and weathering techniques so decided on a very simple single overall Light Stone / Portland Stone colour scheme.


The model was primed with Stynylrez Neutral Yellow which I've found is an excellent base for the light desert yellows and browns.


And then the recesses, panel lines, and darker areas were pre-shaded with Vallejo Model Air Armour Brown. Pre-shading often seems to be done with black and white but because I was using a light brown/yellow I though a deep brown might be a better dark shade.

 
The whole model was then base coated with Vallejo Air UK Light Stone.

 
And a zenithal highlight applied Vallejo Portland Stone, and then the bits of stowage and symbols were all painted.


I used some masking tape to help add an RAC style white/red/white flash to each side - it's a feature that helps tie in the 8th Army styling and adds an extra bit of colour to an otherwise plain scheme.

 
With all base colours completed decals were added (borrowed from WWII British tanks). The diamond on the turret marks the vehicle as part of an HQ element.


Rust added to the engine exhausts, and a wash of Army Painter Soft Tone completed the painting.

 After sealing with a coat of varnish I dug into my box of AK and Mig enamels and began weathering.

 
Ochre for Light Sand filter applied over all surfaces.


Cadian 287th Armoured "Sand Scorpions" regimental symbol on the turret. (Red Scorpions? Never heard of 'em.)


The filter helps the stowage elements blend in and gives a lived-in look to the whole vehicle.

 
Africa dust effects added, concentrating on surfaces were dust and sand would accumulate.


Heavier use of dust applied to the skirt panels.


Rust effects added to the exhausts and rear access hatches.


The last stage was to do some chipping.  Previously I'd just used a single chipping colour (usually a red brown) but I'd watch a video where the use of multiple colours was suggested, including one lighter than the base colour.With this in mind I settled on my usually Charred Brown, but added Sand Yellow, and even a little Silver for recently chipped areas.


Chipping effects on the front.

 
And finally on the turret.

Finished Kangaroo APC


Silver chipping on the access handle to suggest recent and heavy wear.


Tamiya "Soot" weathing applied to the muzzles of the bolters where the rocket effects of those projectiles might be seen.


So, overall - pretty happy with the outcome. Some irregularities in the resin (that ideally I would have cleaned up during assembly) only came to light as I was painting, and I decided I would live with them rather than redo sections. 

Does this mean the modelling drought has broken? We shall see. I do have a Rubicon LRDG truck sitting there just looking at me.

Monday 29 April 2019

Terraforming Mars

Something of an odd post for this site: unboxing photos of a sort.

A while ago I purchased a copy of Terraforming Mars from Abox.nz for rather less than the usual NZ price and there was discussion on Facebook as to whether this was a genuine or fake copy of the game.


I picked it up today and took some photos of the components in hope of answering this question, though I don't have a known genuine copy to compare against.

There was a BGG thread on spotting a fake, so I am comparing with the information there.


The package itself appears to have shipped from an NZ address. Corrugated cardboard and packing tape - nothing fancy and not terribly solid but the game arrived in pretty good condition; slight dent near one corner.


Box in shrink wrap, colours strong and printing crisp.

 
Claims to be made in USA from a variety of components.

Box on the light-weight side, but not particularly flimsy, and seems well constructed.

With the lid off: cards wrapped, cubes in zip-lock bags (with some spare ones for the cards once unwrapped). The bottom of the box is constructed with a removable coloured liner.


Player boards very light-weight but well printed and with no signs of misprints or artifacts unlike the BGG example.


Cubes. Some chipped corners, especially noticeable on the gold. Quite strong dimpling on the cubes, similar to the BGG example.


Rule book is well printed, crisp and clear, on light-weight glossy paper.


Board is quite light and resembles the BGG fake example around the corners. Printing is good.


Tokens seem about average weight for a game, and punch out cleanly. Tokens / tiles have a glossy finish (mentioned on BGG).


Cards seem typical weight for game, with well printed glossy faces. The backs of the cards seem to vary a bit in quality and finish - some have a slightly grainy feel (almost like a matt varnish).

Sorting through the cards for the three listed at the end of the BGG post...


The exact same printing defect on the exact same cards. It would appear this copy of Terraforming Mars is a fake; the same fake as the one detailed on BGG.

So... next steps?  The folks at Abox.nz state they are Auckland based, and even mention Consumer Guarantees Act on their site. Presumably selling fake games (without mentioning this) is less than completely above board.